Friday, November 4, 2011

Texas Chili and Strange Bedfellows

To slow cook or not to slow cook? That is the question.


Do you ever come across a recipe that sounds delicious, but then you realize that you are missing an important piece of equipment to make it? You know, like an immersion blender, food mill, mandoline, etc? That's how it was with me and slow cookers.  I had long heard people extolling the ease of use of slow cookers, and I felt like I was missing out on "something big".


So I did what any good bride-to-be does, and registered for a slow cooker months before my wedding.  Someone generously gifted us said slow cooker. Then same said slow cooker sat at my parents' house due to space restrictions.  Finally, after a year, same said sitting slow cooker came with me to our new, slightly more spacious digs.


And then, but only then, did I start to think about and ponder mighty hard about the virtue of a slow cooker. Did I really need one? What could a slow cooker do that a french oven/casserole couldn't? This pondering was somewhat moot at the time because the return date had long passed.


So, by default, I kept same said slow cooker that had sat until space had sprung. Do I love it? Well, I like it a lot  but wouldn't say love.  Can you do with a good ol' casserole pot what you do with a slow cooker? Well, yes, with adjustment in cooking method and time. 


Well GD-it then what's the point? 


The point is that, to blatantly rip off a certain infomercial that we all know, you can set it and forget it. You prep the ingredients (the prep can either be very simple such as throwing frozen food and broth in there, to doing something more complicated like browning meat beforehand), put them in the slow cooker, turn it on, and just leave it. You don't have to worry about an open flame, you don't have to constantly stir...you just let it be. 


I haven't quite worked up the courage to leave the slow cooker on while I'm at work because I don't want the apartment to burn down (I go apoplectic just thinking about the pugs by themselves), but that probably would be a great advantage of the slow cooker.  For now, I turn it on during the weekends and go about my business (where I'm in and out of the apartment) or leave it on overnight.  


Because, you know, it's one thing for my apartment to burn down while I'm not there, but I'm *totally* okay with it burning down while I'm still in the apartment.  My sense of logic could use some help.


But! That is for another day.


My slow cooker did, however, give me the happy excuse to buy Slow Cooker Revolution from Cook's Illustrated, a book that I am enjoying very much.


I recently made Texas Chili, apparently because Texas is known to have big hunks of beef in its chili.  This recipe uses soy sauce to help enhance flavor and tapioca to help enhance texture.  Who woulda thunk?


Adapted from America's Test Kitchen

Oh crap--one more thing (sorry for the long intro). The original recipe is for 8 to 10 servings. I made approximately a 2/3 recipe.  I'll give the original ingredient amounts, because some of them are not easily 2/3-able and I kinda estimated.
  • 3 onions, finely chopped
  • 1/4 cup chili powder
  • 1/4 cup tomato pasate
  • 3 TBS vegetable oil
  • 8 garlic cloves, minced
  • 2 TBS ground cumin
  • 1 tsp dried oregano
  • 2 15oz cans kidney beans, drained and rinsed
  • 1 28-oz can tomato puree (or tomato sauce)
  • 2 cups low sodium chicken broth
  • 1/4 tapioca or tapioca flour
  • 3 TBS soy sauce
  • 2 TBS minced canned chipotle in adobo sauce
  • 2 TBS brown sugar
  • 2 bay leaves
  • 1 5-lb boneless beef chuck roast, trimmed and cut into 1 1/2-inch chunks (as God is my witness I will buy the beef pre-cubed from now on because I can't exactly call the 30+ minutes I spent struggling to trim the chuck roast as enjoyable) 
  • 3 scallions, sliced thinly
In a large bowl, combine the onion, chili powder, tomato paste, garlic, cumin and oregano.


Microwave (this helps soften the onion and blend the flavors) the mixture for about 5 minutes, stirring occasionally.  Transfer mixture to slow cooker.


Here's my big tip of the day regarding the next step, which involves the chipotle peppers in adobe sauce.  Most of them are vacuum-packed. Please be careful when you open it. I don't want to go into detail about the time that I started to open one and the very SPICY and BURNING contents SPRAYED up in to my FACE including MY EYES and ALL OVER the WALLS and even the CEILING.

So, I open the can facing away from me, very slowly, and I wear latex gloves. I know. Paranoid. 


You bitch.

Stir the chipotle, beans, tomato puree, broth, tapioca, soy sauce, sugar and bay leaves into the slow cooker along with the onion mixture. 


I know, whoever thought you'd be using the following ingredients in the same recipe.

It happens.

Season beef with salt and pepper, and add it to the slow cooker. Everybody in the pool!


Cover and cook for 9 to 11 hours on low or 5 to 7 hours on high.

Let chili settle for 5 minutes and skim off any fat with a large spoon.  Discard bay leaves.  Season with salt and pepper if necessary, sprinkle with scallions, and serve.


Ta-da!


What's your opinion of/experience with slow cookers?

Monday, October 31, 2011

Apple Crisp

Happy Halloween!

Does anyone watch The Walking Dead on AMC? I'm not typically into scary shows, but this one I can handle because zombies are not as scary as, say, a serial killer. But last night's was kind of sad--someone did one of those unthinkable things that you understand that people do under extreme duress, but still something that you're sad and disappointed to see. Seeing as that I view TV shows as the place in the sand for my head to burrow in to avoid ugly realities, I may not watch the show anymore.  Considering that this is how I react to something fictional on a fantasy TV show, I sometimes consider that I am not cut out for real life.
On a happier note, maybe zombies like apple crisp. Or maybe they don't, unless it was baked with human blood. Or maybe they still wouldn't like it, because the blood would have been cooked. Maybe a drizzling of fresh blood at the end. Is this too macabre?
My sister gave me a fantastic recipe for an apple crisp. She adopted it from a complicated one that involved several cooking vessels, and streamlined it into this great recipe. The premise behind this apple crisp is that you want to cook the apples down before baking the final product with the crisp topping--this gives the filling a good cooked (but not mushy) texture without burning the crisp topping. My sister's genius idea was to pre-cook the apples right in the pie dish at high heat in the oven, instead of using a skillet (i.e. another dish to clean). This be tasty.
For filling:
6 to 8 large apples (the original recipe said 6, I used 7, but could have squeezed in another)
2 Tbs sugar
2 Tbs light brown sugar
1 tsp cinnamon
pinch salt
juice of ½ a lemon

For topping:
2 Tbs sugar (I may lower the amount of sugar next time)
2 Tbs light brown sugar
1 tsp cinnamon
pinch salt
½ c chopped walnuts or pecans
½ c flour
¼ c (4 TBS) cold unsalted butter, cut into 1/2" pieces
1 tsp vanilla extract

Preheat oven to 400.

Peel apples, and slice into ½” wedges (not too thin or the end result will be like applesauce).  
I used a combo of Gala and Fuji, for no particular reason except that I had them.
Toss in a large bowl with the rest of the filling ingredients, making sure each piece is coated well -- this is your only chance to get all the flavor distributed.  So don't f*$! it up, moron. (I don't really mean that, but I couldn't resist.)
Pat into 8-9” pie plate. I dotted mine with 1 TBS butter, because I felt like it.
Bake for 30 minutes, uncovered.

In the meantime, make filling.  In a medium bowl, mix together sugar, cinnamon, salt, flour and nuts.
Sprinkle butter and vanilla over mixture and quickly rub in with fingers, pastry cutter thingamajig or a fork. You're going to get a crumbly mixture with some bits the size of small peas. Get it to the consistency where if you smushed some in your hand, it would hold together.


Remove apples from oven and give the apples a stir.
Cover evenly with topping.
Bake for another 20-25 minutes, until topping is golden brown.  Serve warm with ice cream.
The pictures I took of the final product did not do justice to the dessert, so I am omitting them for your benefit, so that you won't be dissuaded from shutting down your computer, going to the grocery store, buying some apples, and going home to make this right now. Like, RIGHT NOW.
Ta-da!

Friday, October 28, 2011

It's Almost Too Much

It really is. Oh pugs.


I understand that, to the untrained eye, these may rather look all the same, but each picture has an almost imperceptible variation that showcases eons worth of additional cuteness. This is a truth, as any other pet-owner may attest.

Monday, October 24, 2011

Baked "Skillet" Pasta

I've been watching a lot of America's Test Kitchen lately.  Does anyone else love that show?  I trust them because I know they've tested each recipe with different iterations dozens of times, and they're so nerdy and cute.

The other day they had this recipe for baked pasta, but a super simplified version that is mostly cooked on the stovetop and then finished off in the oven.  So while you do end up using two major kitchen appliances, the ease of this recipe reigns supreme.  You do not have to cook the pasta separately and then add it to the sauce, which in my mind translates to "this recipe is heaven".

In the interest of full disclosure, I am still trying to figure out the right amount of water to add to this recipe.  The original made this in a skillet and used 12 oz of pasta, whereas most boxes of pasta are 16 oz.  I don't know what to do with 4 oz of leftover pasta, so I used the full 16 oz and made this in a deep saute pan.  The original recipe calls for 3 cups of water for 12 oz of pasta, so you would think that 4 cups of water would be the right amount, but it seemed like a *lot* of water so I lowered the amount to 3 1/2 cups.  That seemed to be fine, maybe still a wee bit on the soft side (the pasta, that is), so I may tinker next time.

Adapted from America's Test Kitchen


  • 1 tablespoon olive oil
  • 3 garlic cloves, minced
  • 1/4 teaspoon red pepper flakes
  • 1 28-ounce can whole peeled tomatoes
  • 2 TBS tomato paste (I did not use tomato paste the first time I made this, but I will next time to up the tomato flavor)
  • Salt and pepper
  • 3 1/2 cups water
  • 16 ounces ziti or penne
  • 1/2 cup heavy cream
  • 3 TBS grated Parmesan cheese
  • 1/2 cup chopped fresh basil (or parsley)
  • 4 to 6 ounces mozzarella, shredded

Serves about 6.

Muster your troops. 

Heat oil in an ovenproof deep saute pan (about 4 quarts) over medium high heat and toss in garlic and red pepper flakes.


Cook for about 2 minutes, until garlic is softened, and pour in tomatoes.  Forget to take a picture.

Add in raw pasta and water, with about 1/2 tsp salt and 1/4 tsp pepper.

Your pasta will be swimming.  That is okay.

Bring to boil, then lower heat to simmer and cover.  Let simmer for about 13 minutes.

While the pasta is simmering, preheat the oven to 475 degrees.  After the 13 minutes (the pasta is almost but not completely cooked), toss in the cream, parmesan, and basil.


Scatter mozzarella over the top of the pasta.


Place saute pan, uncovered, into oven for about 10 to 12 minutes or the cheese is golden brown.


Does that not scream comfort food to you?


Ta-da!

Wednesday, October 19, 2011

Pugs and Chair

There is a coveted spot in our new apartment.  I think it has to do with the warm sunspot.

How are we feeling, my little Bunni? A little toasty?

Gah, momma, why are you always bugging me?

Somebody please take her away from me. Help.

I turned around to see Rikki looking longingly at Bunni in The Coveted Sun Spot.

She seemed resigned.

Two seconds later, Rikki decided she had had enough of waiting in the wings, and grabbed her moment.

Bunni, like the good sister she is, accommodated the latecomer.

Would you call this cozy or squished?

Monday, October 10, 2011

Because You Know You Want One...

I've been looking at a lot of Halloween stuff lately on Etsy.  While I'm not the person that has everything decked out and I don't even wear a costume, I do love Halloween.  Last year it was easier to decorate because we were living in a smaller apartment, and basically you blow up a balloon and the place would be decorated.  This year we're in a smidgen-ly bigger place, but I am on a shopping hiatus.  It's sometimes a very cruel world, something that I hope to tell any child I have as soon as they are able to comprehend English.

So these are for you. In case you want to buy them. Which of course you do.

Okay, I'm conflating Day of the Dead with Halloween. That is bad of me.  But not bad enough that you should deny yourself this colorful, spooky yet happy garland.

How cute is Vicki the Vampire? Just look at those teeth! And the skull bow! She could greet the guests at your party.

Those same guests could receive a goody bag tied up with these little cutie pumpkin tags.

And you should make cupcakes. And hug 'em with these wicked wrappers.


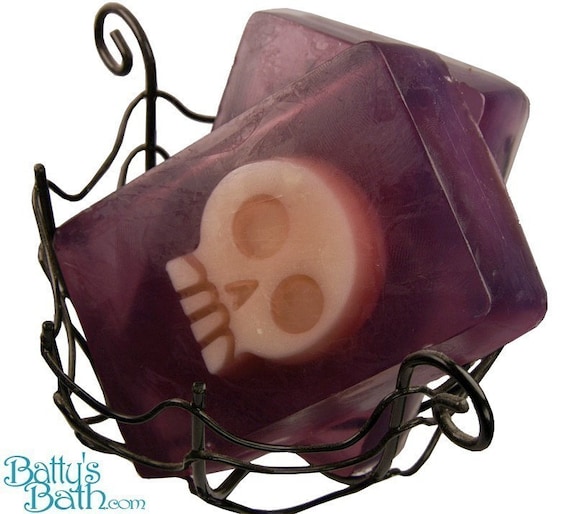
How awesome would it be to have this skullduggery soap?

This punch needle embroidery is calorie free.  So simple, yet it makes me smile.

I love things that glow in the night, like this luminary.

Back to that hypothetical child of mine.  I floated the idea of creating a gallery wall of the following prints for the nursery wall, which my sister thought was fantastic.  I worry about her.  

I love these prints by Lupe Flores. (Yes, that pic on the right is way over yonder.  I can't format in blogger--this should not be news to you.)

And ah mah gah how could I forget what I covet most of all:


Anyone gearing up for Halloween? Do tell!!

Wednesday, October 5, 2011

Chocolate Chip Cookies

A few years ago, the New York Times had an article about the secret to a great chocolate chip cookie.  (Note: in my mind, whenever I think about the date of the article, I think of it as last summer, no matter how many years go by, so imagine my surprise when I see that this is from over three years ago--gets me every single time).  Apparently the key(s) is(are): letting the batter chill for at least 24 hours and up to 72 before baking it into cookies, and using a combo of cake and bread flour.  I think the resting and bread flour (which is high-gluten) allows the final product to be a little denser with a lovely toothsome quality (I don't really know what "toothsome" means but this seems an appropriate time to use it) that is all part of a good, chewy-but-crisp-at-the-edges chocolate chip cookie.

This is self-apparent at this point, but this is not the easiest of chocolate chip cookie recipes.

There are some changes you can make.  Don't have bread flour and you don't want to buy it? Go ahead and use all-purpose flour, no biggie.  Same goes for cake flour? Same answer.  What, you don't have chocolate feves? Neither do I. Don't know what they are? Neither do I.  And folks, I lived literally around the corner from Jacques Torres, which the article specifically mentions as a source for these feves or whatever they are, and never bought them. Regular chocolate chip morsels have never done me wrong in this recipe.

However, the resting time is pretty important to this recipe, if only to let you see what all the hoopla is about. Of course a yummy cookie will still result without resting time, but the resting time leads to a cookie that will have people kinda looking at you in amazement and saying "Oh my gosh you made these?"

Adapted from New York Times


2 cups minus 2 tablespoons cake flour (I used pastry flour, although I have been known to just use plain ol' all-purpose flour)
1 2/3 cups bread flour (personally I haven't skimped on this ingredient because of some oddly rigid belief that the high gluten really contributes to the final product, but I certainly won't come after you if you use all-purpose flour for the whole recipe)
1 1/4 teaspoons baking soda
1 1/2 teaspoons baking powder
1 1/2 teaspoons coarse salt
2 1/2 sticks (20 TBS, yeah you read that right) unsalted butter, room temperature
1 1/4 cups light brown sugar
1 cup plus 2 tablespoons granulated sugar
2 large eggs
2 teaspoons natural vanilla extract
1 1/4 pounds bittersweet chocolate disks or fèves (this is a lot of chocolate, more than you know--you will see later what I mean.  Also, chocolate chip morsels usually come in 10 or 12 oz bags, so I just use two of them and call it a day.)


Makes 1 bajillion cookies

First, mix the flours, baking soda, baking powder, and salt in a bowl.  The original recipe says to sift, but I don't sift. I never sift because I'm lazy and sifting is messy. I whisk the ingredients.  It's totally not the same thing but I don't care. Which seems contrary to the fact that I'm spending so long on justifying why I don't sift. Hm.
Wow, a phone camera just doesn't compare, does it. By the way, that little pear crock is my salt crock.

In a large mixing bowl, cream together the butter and both sugars, scraping the bowl a couple of times with a spatula. Add in the eggs one at a time, beating and scraping well after each addition.  Also add the vanilla extract.
My butter was a wee bit soft, so yours might look a bit fluffier than this.

Next, mix in the dry ingredients into the butter/sugar/egg mixture in batches. This will seem like you're squeezing an elephant's worth of flour into a mixing bowl.  Don't worry, this is par for the recipe.


Then add in your chocolate chips.  This will seem like adding another elephant's worth into the mixing bowl.  You will give up on using the mixer because it will have started wheezing and whining, and perhaps you will see fumes emanating from the mixer.  Take over with a spatula and show that cookie monster who's boss.


Cover batter with plastic wrap and place in refrigerator for at least 24 hours and up to 72 hours.


About 30 minutes before you're ready to start baking the cookies, take out the batter and let soften from the chill.  It will make it easier to scoop.


Wait, don't get me wrong. It will still be hard to scoop. And such is life. Did I mention this recipe wasn't easy.

Anyway, preheat oven to 350 degrees.

Line/spray your baking sheets and drop large golf ball-sized mounds of dough onto the sheets (the recipe says 3 oz balls, like I have a kitchen scale or something, psh).  Leave a few inches between each mound, about 6 per standard sheet.


Bake for 15-20 minutes, rotating sheets halfway through, until cookies are light golden brown.  Let rest on sheets for about 5 minutes before transferring cookies to a cooling rack.

Then, after all that work, you can enjoy! Or, pack up all of them for your husband to bring to his coworkers, belatedly realizing that you got to enjoy only one cookie. One, lonesome cookie.


Ta-da!