Showing posts with label wine. Show all posts

Tuesday, August 24, 2010

How to Open a Bottle of Bubbly


I love bubbly. I adore it. It's so festive, it's usually quite tasty, and it comes in pink! Plus it goes by awesome names such as cremant (cwe-mah (all French-like)), lambrusco (lammmm-brUUUsco!), prosecco (prooo-SECCO!), cava and obviously champagne (cham-PA-gna!).  It's our year-round drink of choice at home (okay mine, I'm the one that gets home in time to visit the wine shop).  

Plus, bubbly doesn't have to be expensive--you can find yummy bottles of bubbly for under $20, and a decent number under $15.  For example, Kevin and I really like Gruet, which is made in, of all places, New Mexico. It's about $13 at our local wine shop (and they tend to overcharge, so we could probably find it cheaper elsewhere).

I've been at a gathering or two where I ended up with the happy responsibility of opening a bottle of bubbly, because others weren't sure how to do it.  I admit, the first few times can be kind of intimidating.  What if you blow a hole in the ceiling, or worse yet your FACE?  

Many of you know how to open a bottle of bubbly, and quite well.  This post is not for you.  It's for any of you out there that would like a few tips to become more comfortable opening one of these glass containers of effervescent joy. 

What you do is take your bottle of bubbly:


Take your sabre:


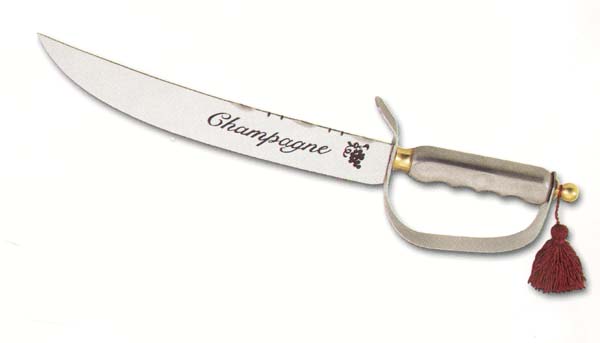
And lop that sucker off!


Then cheer like the champion that you are:

Okay I'm kidding, don't do that.  


If that simple missive didn't work, let me mention apparently you can kill someone if you don't do this correctly.  So just DON'T, okay?? Put the credit card back in your wallet and back away from sabrestokillyou.com.

Okay, I'll tell you what I actuallyl do.  It's a combination of tips/technique that I learned from some dude giving a tour at Schramsberg winery years ago, as well as reading a few pages of Great Wine Made Simple by Andrea Immer.  

Just to warn you, this isn't going to be the raucous, foamy (and wasteful) method employed by male professional athletes in a barely disguised attempt to imitate what they think is their "manlihood". Okay enough, get the image out of your head.  

This is going to be a bit more calm, and maybe boring, but really, when you're like me and just opening a bottle of bubbly when you get home, there's no reason to impress my pugs with my "manliness" and showmanship.

Ahem. Let's begin.  First take off the foil.  I'm assuming this will be intuitive for everyone but in case not (you don't have to raise your hand), here are some pics:


Earth-shattering, isn't it? Anybody catch Rikki in the background?

Now, face your mortal enemy.


Untwist the metal hoop of the wire cage surrounding the cork.  Andrew Immer even suggests the extra step of having a kitchen towel draped over the top of the bottle this whole time in case the cork tries to fly off the second the wire cage is loosened.  Don't believe me? Kevin took off the wire cage one time, looked down at the cork, and it flew up in his face. Thank God he was wearing glasses.  That being said, I forego the towel at this stage (but use it later).


So now that you're scared, keep untwisting, flex the sides of the cage a bit to loosen, and slowly remove (again, you can drape the kitchen towel if you want).


Now for twisting off the cork. This is the part for which I do bring in a kitchen towel if there's one around.  I use it to help my grip and for safety reasons.  


To remove the cork, the key word is "twist".  Do NOT try to just pull or push that sucker off. That will hurt somebody.  As I'm twisting the cork with one hand, I grab the base of the bottleneck with my second hand and twist in the opposite direction and to stabilize.  Twist as many times as you want, no one's counting.  The first few might be tough because the bubbly may have dried and gotten sticky. I usually use small, short twists.


At a certain point you will get past the initial loosening of the cork so that it twists relatively easily, and now comes the dialectic part.  While you twist, you want to pull up a bit, but at the same time you want to leave enough pressure so that the cork doesn't come flying off.  It's a push-pull situation.  Think of it as guiding the cork off--all the built up pressure in the bottle is the main force behind the cork coming off, you're there just to give a hand (pun).

This was the most interesting thing I learned at the winery--while the sound of a cork popping is fun, it actually is not the safest, and you lose more carbonation that way. Not sure if that's true, but whatever.

Anyway, so the idea is, as you're twisting, to help *ease* the cork out, with one side coming out first.  You don't have to twist it out all at one time. It's almost like prying the cork out, with a pphhzz sound (like a small, wheezing fart).

hello, i am here!

The sight of this makes me want to weep with joy.

Wait, no, this makes me sob with gratitude.

Oh wait, no, this makes me bawl with utter happiness.

Dagnabbit, now I'm catatonic.

If you're not going to be drinking your bubbly all in one go, and you drink bubbly often, it's worth getting one of these stoppers specifically made for bubblies.  I'd explain how to use it but I think I've insulted your intelligence enough today. Just pictures.


And that's how it's done.

Monday, July 12, 2010

Canned Tomatoes: Gazpacho and Bloody Mary

I love tomatoes.  I love eating them raw, like an apple.  I remember eating big, red tomatoes from my parents' garden, where you could smell the sunshine and the vine from where it came.  You know that tomato-vine smell? Love it!  One of my favorite things to do is, when the weather is warm, drop by the grocery store on the way home and buy a pint of cherry tomatoes and just eat 'em all. 

Sadly, I don't have a garden of my own, and really great garden tomatoes are scarce and expensive on the East Coast.  And since I love cooking with tomatoes year-round, I've also fallen in love with canned tomatoes.  I think canned tomatoes are great--picked when ripe (hopefully), and definitely the better choice over the pink anemic mushy things they call tomatoes during the off-season.  I am known to eat them straight from the can. I know, I'm disgusting. 

One thing I love to make with canned tomatoes during the summer is gazpacho.  Or, I should say, a tomato soup in the gazpacho style, because this recipe is based on nothing authentic.  If I made this with fresh tomatoes from the farmers' market, it would be a $40 gazpacho or something.

For the "gazpacho" (this makes a lot of servings--like, 8-10):
  • two 28 oz cans whole peeled tomatoes
  • one 14.5 oz can tomato sauce
  • 4 small Persian cucumbers (or half of English hot house cucumber--you could probably use Kirbys as well, but I would seed those first), chopped
  • 2 bell peppers, chopped
  • 2 small or medium shallots, very finely chopped (about 1/4 cup)
  • about 3 TBS of red wine vinegar (I'm sure I'm probably supposed to use sherry vinegar but I don't have that. I threw in a little balsamic as well)
  • about 2 TBS olive oil

In a bowl or measuring cup, mix together vinegar and oil.  Since I'm pretty shoddy with measurements, please do this to your own taste.  Place shallots in mixture, let sit for at least 10 minutes, stirring occasionally.  I'm a fan of softening any allium in a sauce mixture first before serving raw, just to take the bite off.  


Puree tomatoes (with canned juices) and tomato sauce in blender.  You could buy already pureed tomatoes or diced tomatoes if you don't have a blender or food processor, but I have this weird hang-up about buying them whole because I think they taste better.  The already pureed ones taste a wee bit watery and the diced ones have a tougher texture--but I would totally use them if I were feeling lazy or did not have the right equipment.

The inaugural use of our wedding gift blender

Throw in bell peppers (I used one orange and one yellow, not pictured below), cucumbers, and vinegar mixture with shallots.


You may want to just add part of the vinegar mixture to start, as you can add more later.  Stir well.  I added a pinch of salt as well, but just a pinch because there is plenty 'o' salt in the canned tomatoes.  Season to taste--use more olive oil or vinegar as you like.


Ta-da! Next time, I might use more cucumbers and bell peppers.  Trust me, you want them as refreshing crunchy bites to cut through the acid and salt of the tomatoes.

I had another can of tomatoes (wasn't sure how much I would need for the recipe), and since I lack storage space, I made a bloody mary for myself. Yum.  These ingredients are all to taste, but I would say you will probably use more celery salt and worcestershire sauce then you think you need.  These are the basics:
  • Whole canned tomatoes, pureed well
  • Jarred horseradish
  • Worcestershire sauce
  • Tabasco sauce
  • Celery salt
  • Vodka

Mix together and season to taste (I know, so specific).  For one drink, I tend to do just one dash of the tabasco, a few dashes of the W sauce, almost a tsp of the horseradish, and almost a tsp of the celery salt.  But seriously don't trust me on that because I have no idea how much I actually used.


Ta-da! That's a sad little stick of celery.

To go along with the "gazpacho", I made some potatoes.  I totally made up this recipe, so seriously there is no method to it and is kinda haphazard.
  • about 1 1/2 pounds small red potatoes, sliced to about 1/4 to 1/3 inch thick
  • 2 cloves of garlic, thinly sliced
  • olive oil
  • smoked paprika
Take sliced potatoes, put them in a microwave-safe bowl with a few TBS of water, cover with wet paper towel, and microwave for about 10 minutes (or until cooked through), stirring once or twice.


I know, I know, you think I cheat by using the microwave. I don't care.  I do this for almost all my vegetables.  I get 'em nice and soft in the microwave, and then roast them (or in this case, saute them) for a crispy outside.  I used to always manage to dry out and burn the outsides of my vegetables when trying to cook them all the way through in the oven, so I now use the microwave method.  Alternately, you could also boil the potatoes in salted water until they were cooked through (be careful not to overcook).

Place garlic and generous amount of oil into skillet (enough to generously coat bottom).  Turn heat to medium high.  I like putting the garlic and oil into a cold pan so they can slowly cook together and the garlic flavor infuses into the oil without me worrying about burning the garlic.  Before garlic browns, remove garlic.

Carefully place as many potato slices as you can fit.  There should be a healthy sizzle.  I sprinkle on some salt at this point.  Turn when golden on one side, anywhere from 2-4 minutes on each side depending on your level of heat.  Flip and brown on other side (sprinkle some more salt).  Depending on the number of potatoes you have, you may have to do several batches.

After slices are browned on both sides, remove to plate and sprinkle generously with paprika.

The next time I do this, depending on how I feel, I might replace the sauteeing with roasting them in a shallow baking dish at 450 degrees for a few minutes, flipping, and roasting again.  Babysitting the potatoes in the skillet took some effort, although I have to say it was TOTALLY WORTH IT.


Ta-da!

Tuesday, June 22, 2010

Monday Dinner: Pasta with Preserved Tuna and Olives

Monday again. WWHHYYY???

Anyway, I figured it was time for one of my favorite recipes--pasta with tuna, olives and capers.  It's relatively easy and super, super tasty.  However, just to warn you, cheap it is not.  Why is that?  It requires few ingredients, but they have to be good.  Here are some of the main ingredients:


Yeah, see that stuff on the left? It's tuna packed in oil.  As the sign in the supermarket said, this ain't your regular canned tuna. The recipe is insistent about high-quality preserved tuna, so high-quality preserved tuna I use. To the tune of $8 for 7 ounces. Oh, but wait, I need 14 ounces. Yes, so it's $16.  But it's honestly delicious. I can eat it straight out of the jar.  That's why, while I love this recipe, I don't make it terribly often. Here's the ingredient list:


  • 1 pound dried fettuccine

  • 1/4 cup extra virgin olive oil

  • 2 teaspoons minced garlic

  • 6 anchovy fillets, rinsed, dried, and minced

  • 1 1/2 cups canned tomato puree

  • 1 tablespoon capers, rinsed and chopped

  • 1/4 cup Gaeta olives, pitted and chopped

  • 14 ounces excellent-quality tuna preserved in olive oil

  • Freshly ground black pepper

  • 2 tablespoons chopped flat-leaf parsley

  • Let's not forget this:


    First, I chop up everything that needs...chopping--the garlic, parsley, anchovies, and olives.  I'm not a big fan of anchovies on their own, but I really love using them in cooking. The just melt away into your dish and add this salty earthiness.  Again, use the good quality stuff packed in olive oil for this.  You're supposed to rinse them before you chop, but I didn't. 


    Now for the Gaeta olives. I imagine you can use Kalamata also.  To pit the olives, I gently crush them with the side of a knife--do this carefully, as they are slippery and you don't want to sever tendons. 


    Flattened ones at the bottom, unblemished ones at top

    When you crush them, you'll find that it's very easy to kinda pry them apart and squeeze/pull out the pit.

    See? Olive deconstructed: a retrospective.

    The recipe calls for 12 ounces of tomato puree.  I don't know if that's the same thing as tomato sauce.  Tomato sauce tends to be a little sweet, so to be safe I just took a can of 14 oz peeled whole tomatoes and pureed them.  Then add 1 TBS of capers (you're supposed to rinse them first, but I didn't).


    Saute the garlic in some olive oil (I actually used the oil that the tuna was packed in), add the anchovies and cook for a few minutes, then dump in the tomato/capers puree.


    The recipe says to then add cooked pasta, tuna, and olives, but I cooked the sauce for about 30 minutes.  I feel like extra simmering time for pasta sauce only helps.  After the pasta was cooked, I added it to the pot, along with the tuna (broken up), the chopped olives, and parsley. I found the parsley to be particularly refreshing in this dish.


    Ah, the beauteous tuna.


    Since I was lazy and neglected to rinse the anchovies and capers, *and* used the salty tuna oil for sauteeing, I didn't add any salt.  The dish was still a tad salty, so if you want to be more careful, rinse the anchovies and capers, and/or use olive oil instead of the tuna oil.


    Ta-da!

    Wednesday, June 16, 2010

    Wednesday Dinner: Garlic Scape Pesto

    As much as I like cooking, I don't like to stand over a hot stove and slave over a complicated recipe, especially during warmer months and on weekdays.  The farmers' markets have lots of garlic scapes these days, and I finally bit the bullet and cooked with them last week, but only very tentatively (I added them to a farro dish).  What's a garlic scape? It's the stalk of a garlic bulb that, during late spring/early summer, is tender enough to cook with, and in these parts is considered a seasonal treat.  (We're no California so we have to obsess over what we can.)  It looks like a curly, firm green onion and has a very mild garlic flavor.

    I wanted to try cooking with them again, especially the season is so short.  Dorie Greenspan, cookbook author and general food doyenne, coincidentally posted a recipe for garlic scape pesto the other day.  Perfect for a weekday dinner.  It's basically garlic scape, almonds (or whatever nut you want), parmesan, and olive oil all whirred together in a blender or food processor.  I made a few changes, which you'll see below. They're earth-shattering. (no they're not)

    Of course, had to start with my favorite cooking partners, a glass or two of bubbly and charcuterie from the nearby Salumeria Rosi:


    I've never had this prosecco before. It is molto yummy.


    I've been on a culatello kick lately.  I didn't even know it existed until recently.

    Gorgonzola and Parmesan. You know, it's like I have a meal before my dinner. But that's the kind of entitlement I get as the cook.

    I decided to add some cherry tomatoes to Dorie's recipe, even though, as she points out, they're not totally in season. Whatever. I think acid does so much for a dish.  I cut up about 2.5 cups of tomatoes (you could use grape tomatoes as well).


    And now for the main event, the gorgeous garlic scape.


    I chopped up about 12 to 15 scapes, which comes to a little over a cup.  I sauteed them with a little olive oil and salt before putting it in the food processor, just to take off any harsh "garlic" edge (I got this idea from America's Test Kitchen, which has you blanch garlic cloves before putting them in traditional pesto).


    Also dumped in toasted slivered almonds (I added a little more than the recipe called for because I like the sweet nuttiness), and grated parmesan (again, I added more than what the recipe called for but what dish doesn't benefit from more parm?):


    Dump it all in the food processor with about 1/2 cup of olive oil. I also added about a 1/2 cup of basil leaves. Take the ingredients to task:


    Toss with freshly cooked pasta (I used spaghettini because I had a box of it sitting around) and the tomatoes and mix well. I found that adding about a 1/2 to 1 cup of pasta cooking water made it much easier to mix.

    Ta-da!

    Ta-da again!

    Good stuff.