Monday, August 23, 2010

Fresh Tomato Sauce

Last week I was feeling a bit tired of my own cooking--you ever get that way?  Just sooo nonplussed.  But I tried to soldier through and made a "seasonal" recipe, because it felt like I should, and had various pictures like these to show you:


But I didn't like it.  I think it's supposed to be a side dish, but I tried to eat it as a main. Maybe that was the problem, but in any case I felt like all that corn and okra went to waste. Just wasn't feeling it. 

So the next dish I made was an old favorite, which felt very reassuring after the corn-okra mediocrity.  Then this past weekend, I decided that I needed to keep it simple, as I was still in need of an antidote from my own cooking wariness. 

I was actually looking to make one of those really fresh tomato sauces where the only "cooking" that goes on is when you toss the hot pasta into cut tomatoes and minced garlic.  I found a recipe in the Gourmet cookbook for fresh tomato sauce which had the bare ingredients, and decided I was good to go.  So I bought the ingredients and got ready to "cook".

Which turned out to be a real "cook", because despite the years that I've been cooking, I frequently still manage to fail to read the recipe and didn't realize that "fresh" was a relative it not even somewhat abstract term for this recipe, and it did in fact require about 1 hour of simmering.

Oh fine, it was still simple.

Adapted from the Gourmet cookbook (I couldn't find it on Epicurious, so no link to the recipe):
  • 3 lbs tomatoes, such as beefsteak
  • 1/2 tsp salt
  • 1/2 tsp sugar
  • 2 TBS olive oil
  • 2 garlic cloves, slivered
  • pinch of crushed red pepper flakes
  • 1/8 cup julienned basil
  • 1 lb pasta
So I made tomato sauce. Yay.


I bought this interesting pasta that looked all artisanal from the fancy section of the grocery store. It was fine, but each piece of pasta cooked a bit unevenly. Not a big deal.


The recipe says to peel, core, and seed the tomatoes.  I didn't feel like peeling them (which involved making a little x mark on the bottom of the tomato with your knife, dropping the tomato in boiling water for about 30 seconds, then dropping the tomato into ice water, and removing the peel--yeah, no).

To core a tomato, stick the tip of your knife into the top of the tomato, at an angle so that the tip is slanted towards the center, and move the knife all the way around.


Remove your little cone-shaped core.


Purdy.


Squeeze out the seeds and excess juice over sieve set over a bowl.


Discard the seeds that collected in the sieve. Save the juices.


Coarsely chop the tomatoes, combine with sugar and salt.


Heat olive oil in saucepan over medium heat.  Add the garlic and the crushed red pepper, and cook until garlic is light golden brown.


Add in the tomatoes, reserved juices, sugar and salt.  Bring to boil, then lower heat and simmer sauce for 45 minutes to an hour.


Cook pasta according to directions, shaving time by one minute. Drain pasta, and add to tomato sauce and cook for about 1 minute.  When serving, top with basil and a little bit of Parmesan.


Ta-da!

Friday, August 20, 2010

Summer Berry Crisp

Ooh la la! Summer berries. Sweet, tart, juicy yummy and all around lovely.  For the totally exciting finale to our dinner party, I made a summer berry crisp.  I love crisps.  You get the fruit and the crunchy sweet carb topping, and you don't have to make pie crust. SO easy. And this recipe was particularly delicious, because it contains little more than the ripe berries of the season, and a very easy and tasty crisp topping.

Here are the ingredients.  You can use any combination of berries that you want, as long as it comes to about 6 cups.

Fruit filling:
  • 2 cups blueberries (I used about 4 cups of blueberries cuz dey were da CHEAPEST)
  • 2 cups blackberries (1 cup, these suckers are expensive)
  • 2 cups raspberries (these too)
  • 1/4 cup sugar (I cut back a little because the blueberries were pretty sweet and I had so many of them cuz dey were da CHEAPEST did I mention that)
  • 1/4 cup all-purpose flour (I used tapioca--flour can sometimes make it a little gray/goopy for me, but that may be my baking "technique")
  • 1/4 teaspoon cinnamon (optional--I don't have the most sensitive palate, but this really didn't come through given all the berryness. I guess you could put it in the topping, though.)
Crisp topping:
  • 1 cup rolled oats
  • 1/2 cup all-purpose flour
  • 1/2 cup brown sugar
  • 1/2 cup sugar
  • Pinch of salt
  • 1/2 cup (1 stick) cold unsalted butter, cut into small pieces
  • Whipped cream or vanilla ice cream, for serving
Oh you luscious little orbs

Preheat oven to 350 degrees.  Butter a 9-inch pie plate (I used a deep dish one, which ended up being a good idea because what the hell 6 cups is a lot of berries).  

Then I made the crisp topping.  Dump the topping ingredients except for the butter into a medium or large bowl and mix well.


Scatter the butter pieces over the oatmeal mixture.


Using a pastry blender or your hands, mix in butter until it resembles coarse meal. I have a pastry blender but hardly ever use it--I prefer to use my hands so that I really "feel" the ingredients and infuse my love into what I'm crafting. I'm kidding, I just don't want to wash the pastry blender.  If you are using your hands, try to be light and quick, you don't want the butter to melt (it's important to use cold butter).  

Meh, maybe it doesn't look like coarse meal, but close enough.

Refrigerate until ready to use.  In another bowl, combine the berries, sugar, tapioca and cinnamon.  Toss until combined.


Put buttered pie plate on a baking sheet (I also line the sheet with foil to help with mess--burnt sugar doesn't wash off too well).  Pour the berries into the pie plate.  Cover with crisp topping. Don't forget the edges, especially because that's where the juices like to escape.


Bake for about 50 minutes to 1 hour, rotating dish halfway through, until topping is golden brown and juices are bubbling.  Remove from oven to a cooling rack.  Let cool and serve warm, with ice cream, whipped cream, or nothing else at all.

Do you like how I stage my photos? Like, with the crumpled foil and everything?


Yeah, this is more a picture of the ice cream than the crisp, but I was rushing to eat with everyone else.

Ta-da! 

Thursday, August 19, 2010

Corn Salad and Sauteed Zucchini Ribbons

And now for the exciting second installment of the vegetarian fiesta.  For the side dishes, I made zucchini ribbons with tarragon, and corn salad with vinaigrette.

While I don't quite adore zucchini, it is overflowing at the markets and surprisingly sweet and flavorful.  Plus I've always wanted to make zucchini ribbons, and this was my golden moment. Dun dunna nah!! (verbal translation of trumpet blaring)

You will need:
  • 2 pounds zucchini
  • 2 tablespoons vegetable oil, divided (I used olive oil)
  • 1 tablespoon chopped fresh tarragon
  • 1 teaspoon fresh lemon juice, or to taste (1 tsp is piddly, I added more)
  • Requisite salt n pepa
Serves about 6 as a side. 

Chop your tarragon. If you don't like tarragon, use any other herb you like, who cares.


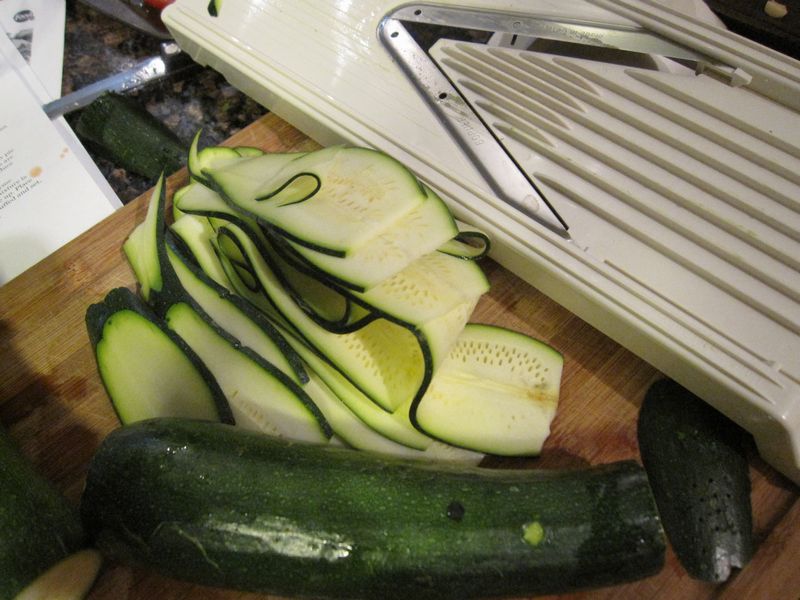
Slice your zucchini using a madoline on the thinnest setting, about 1/8".  I mentioned the mandoline I have in this post.


Them are sticky suckers.

Heat oil in large skillet over medium high heat.  Toss in half of zucchini (only HALF) because it will not fit and you won't be able to cook them evenly.  Turn gently and frequently with tongs until just tender, about 3-4 minutes.  Salt and pepper to taste.  Remove from skillet.  Repeat with remaining half of zucchini.


Toss with lemon juice to taste.  Don't toss in the tarragon until right before serving--if put in too early, the tarragon will turn black. If you're using a hardier herb, like parsley or thyme, you can probably toss it in earlier (and actually for something like thyme you may want to toss it in while you're cooking the zucchini).

I'd have a pic of the finished product for you but the guests were there and I could only take so many pictures without looking like a bat.

The corn salad is just a few main ingredients.


You need:
  • 5 ears of corn, shucked (I used 4, mainly because I didn't want to cut the kernels off of 5 ears)
  • 1/2 cup small-diced red onion (1 small onion) (I used shallots, and 1/2 cup turned out to be WAY too strong, and I hand-picked most of the suckers out of the salad, giving myself repetitive strain injury. I'm not kidding.)
  • 3 tablespoons cider vinegar
  • 3 tablespoons olive oil
  • 1/2 teaspoon kosher salt
  • 1/2 teaspoon freshly ground black pepper
  • 1/2 cup julienned fresh basil leaves
Serves about 6 as a side.

First, make the "vinaigrette".  The original recipe just says to prep the corn and mix the dressing ingredients in later, but I wanted to soften the bite of the shallots and let them sit for about 30 minutes in a mixture of 1/2 water and 1/2 cider vinegar, with pinches of salt and sugar.


I then drained the shallots, and mixed it with the other dressing ingredients, cutting back a little on the cider vinegar since the shallots had already soaked in vinegar.

For the corn, bring a large pot of water to boil.  Place the corn into the pot and cook briefly, about 3 minutes.  Remove to bowl filled with ice water to stop cooking.

Now it's time to remove the kernels from the cob, a process which I find simultaneously fascinating and a pain in the ass.  The first few times I tried this, kernels were flying every which way.  This happens more so when you are working with raw corn, so I appreciated that in this recipe the corn was gently cooked first.

My set-up is to take the biggest bowl I have, and then take a small bowl and put it upside down into the center of the large bowl, like dees:


I use the large bowl because it's big enough to catch the falling kernels.  But I use the small bowl to achieve some height, since it's hard to reach with my knife all the way to the bottom of the bowl. Oh it makes sense once as you do it.  Although you don't have to, you can just do this in a big bowl, on a plate, on your cutting board, whatever.

Prop your ear of corn on the small bowl.


Carefully take your knife and run it down the side of the ear, essentially shaving off the kernels. I couldn't take a picture of this because I don't have three hands, but I'm sure you can find pics/video on the internet.  Like this one:


If you feel like it, then take the back of your knife and run it along the cob to get out the rest of the milky corn goodness.

This is a trick. I didn't grow a third hand--the knife is just resting on the rim of the bowl.  For shaving off the kernels in the first phase, the blade will be flipped the other way, BUT NOT AT THIS ANGLE unless you want to slice through the cob and anything behind it, like your wrist.  The blade should point down towards the bottom of the bowl, like in that pic I showed you.

Toss the kernels with the vinaigrette.  Painstakingly remove, one by one, bits of shallot if you've determined, far too late, that they are overpowering.

I forgot to take magazine-worthy pics for you, but here are the zucchini and corn alongside the tomato and goat cheese tart.


Ta-da!

Wednesday, August 18, 2010

Roasted Tomato, Onion and Goat Cheese Tart

For the past month or so, the weather during the weekdays in NYC has been all kinds of suckola (heat, humidity, stinkiness, plagues, locusts and famine) but the weekends have been loveola.  Just in time to have some folks over and eat out on the patio.  And more recipes for you (and vegetarian, no less).

For this dinner, I made an oven-roasted tomato, goat cheese and onion tart, zucchini ribbons with tarragon, and corn salad with shallot vinaigrette.  For dessert I made a summer berry crisp.  To avoid total boredom on my and your parts, I'm going all Harry Potter and will break up the recipes into different posts. 

In this volume, we reveal the tomato tart, which I made based on an amalgamation of various recipes: (1) oven dried tomato, black olive and goat cheese tart; (2) tomato, goat cheese and onion tart; and (3) a little touch from Ina Garten's tomato and goat cheese tarts.

Ingredients:
  • 1 sheet of pre-made puff pastry, thawed according to package directions (there are usually 2 sheets to a package)
  • 1 1/2 TBS chopped thyme 
  • 1 large onion, thinly sliced
  • About 4 small garlic cloves, thinly sliced
  • 6-8 roma (plum) tomatoes, sliced crosswise about 1/3" thick
  • 4 oz plain goat cheese (if you use Boursin or something I will hunt you down and hurt you)
  • 2 TBS grated parmesan
  • 2 TBS julienned basil leaves 
  • Plenty 'o' olive oil 
This recipe served 5 people (with second servings).

Making the tart consists of several key components: roasting the tomatoes, caramelizing the onion, making the puff pastry shell, and shoveling everything into the shell. This is an all-day recipe, mostly because the roasting of the tomatoes.

Some recipes just call for fresh tomatoes, but I really love slowly roasted tomatoes--it concentrates the sweetness to an incredible degree, and less water leaches out into your tart.  Plus the roasting shrinks the tomatoes, so you can pile more of them in the tart for greater tomato flavor. However, unlike the thinly veiled threat re: Boursin, no one will come after you and hurt you if you just use freshly and thinly sliced tomatoes--just squeeze out some of the seeds and innards, which may bring too much moisture to the table, depending on what recipe you use.

Also, once as the tomatoes are done, it probably makes sense to continue this recipe with the puff pastry and prep some of the other ingredients while the puff pastry shell is pre-baking.  However I kept forgetting to defrost the damn pastry throughout the day and did this in a weird order.  Doesn't matter too much either way, but just wanted to let you know.

First, the tomatoes.


Preheat oven to 300 degrees.  Slice your tomatoes, sliver your garlic, and mince your thyme.  Lay out the tomatoes on two well-oiled baking sheets.  Scatter half of the garlic slivers on and around the tomato slices (reserve the other half for the onions), sprinkle on about half of the thyme leaves (reserve the other half for the onions), and lightly sprinkle with salt.


Drizzle the tomatoes with 1/4 cup of oil.


Roast for about 1 1/2 to 2 hours, rotating baking sheets about every 30 minutes.  I'd show you the picture of the roasted tomatoes but it got towards crunch time and I forgot.

So, moving on to the caramelized onions. Slice your onions thinly (i.e. no more than 1/8 inch, although the point is really to try and keep them of uniform thickness, which I never do anyway because I don't possess those kinds of knife skills).

(that's the other half of the slivered garlic in there with the onions)

Heat about 2 TBS of olive oil over medium low heat.  Toss in onion and garlic. 


Cook slowly, stirring occasionally, until golden brown--this can take anywhere from 15-30 minutes, depending on the size of your onions, the heat, etc.  Towards the end of the cooking, throw in the rest of the minced thyme, plus a little salt and pepper.  You will get this sweet golden oniony-ness, although yours may not suffer from the same personality disorder that mine did due to uneven slicing.


Now let's get this puff pastry thing out of the way, shall we. Basically we create the puff pastry by rolling it out, putting it in our tart pan, and blind baking it (weird term for pre-baking a shell) before putting in the filling.

Preheat oven to 375 degrees.  Roll out the defrosted pastry sheet on a well-floured surface, moving frequently to avoid sticking, to about a 12 or 13" square. 


Transfer to a 9" tart pan with removable bottom.  To do this, I fold the pastry into quarters, place it in the pan, trying to center the middle point of the sheet to the center of the pan, and unfold. *Gently* press the puff pastry into the corners and up the sides. This may involve lifting up a side of the pastry sheet and allowing it to settle into the corners of the pan.  You don't really want to stretch it.


Trim the overhang to about 1/2 to 3/4" inch (I used scissors).  Fold in overhang and press against sides to reinforce the sides of the pastry shell.


Prick the bottom of the shell with a fork.  I forgot to do this and boy I wish I had.  Oil a piece of foil (oil foil, heehee), and put the oiled side face down into the pastry.  Fill with pie weights, beans or rice (I use dried garbanzo beans that I save and reuse for this purpose).  You do this in order to weigh the pastry down and help it keep its shape while baking, since this is "puff" pastry and it has a tendency to do just that.


Bake for about 20 minutes.  You know how I said I didn't prick the bottom? Yeah my bad.  The point of doing that is to let air escape instead of having the bottom puff up.  When I opened the oven after 20 minutes, I was greeted by the bottom of the pastry billowing up so high that it was lifting the beans.  I attacked it with my fork.

Anyway, remove the foil and beans, and put back in oven until light golden, about 8-10 minutes.


My pastry shell ended up looking a little anemic on the bottom, and I give a shit not.

Then comes the layering.  Of which I would show you pictures except that again, it was getting to crunch time and I completely forgot.  But anyway what you do is:
  • Lower oven heat to 350 degrees
  • Spread onions evenly over bottom of shell
  • Distribute half of crumbled goat cheese over onions
  • Layer oven dried tomatoes in concentric circles, each tomato slightly overlapping with the other
  • Distribute remaining goat cheese over tomatoes
  • Sprinkle with parmesan and basil leaves
  • Bake for about 20-25 minutes, until edges of pastry are golden brown and cheese is slightly browned (mine didn't brown that much, to be honest, but I didn't want the pastry edges to burn so I pulled it out)
Ta-da!

Kinda looks like a pizza, eh?  I'll show you the other recipes next time.